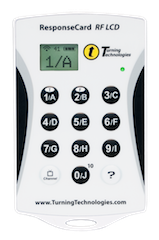
What’s a clicker?
A while back, I took a Biology class that required the use of “clickers” – little RF remotes that allow lecturers to get real-time feedback from their students.

Most students in classes that require clickers will buy a clicker for $50 or so, use it for a quarter, and then forget about it deep in their backpacks. The technology is proprietary, so while the documents filed with the FCC are informative on a surface level, the application was also granted long-term confidentiality and the inner workings of the device are not public.
Former work
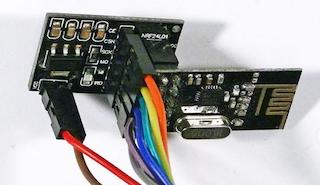
Searching for info online led me to the previous work of Travis Goodspeed and Taylor Killian, who have both written quite a bit about the clickers. In short, the clickers use a widely-available chip called the nRF24L01 – the chip is cheap enough that I was unable to easily get my hands on fewer than 10 of them.
There is also tons of information out there about the nRF24L01. I relied heavily on the Arduino-Info nRF24L01 page for information about hardware, pinouts, and libraries. I ended up also buying the “base modules” (basically 3.3V power conditioners) and wiring a base module + nRF24L01 breakout to an Arduino Nano clone that I had from some previous projects.
My setup

I connected up the base module to my Arduino Nano exactly as described on the Arduino-Info nRF24L01 page and got to work with the fantastic TMRh20 RF24 library. The only “gotcha” I ran into was setting the address of the reading pipe. Packets sent by the clickers look like this:
 TT TT TT    SS SS SS     DD    CC CC
target MAC  source MAC   data    CRC
The “right thing” to do when intercepting clicker responses is to open a reading pipe associated with the target (base station) MAC. This way, the data you will receive will be the source (clicker) MAC, data, and a CRC. I had accidentally opened up a reading pipe associated with the clicker’s address – which is actually fine as the chip will still listen for that address and send everything after that address to the Arduino over SPI – but if your reading pipe is associated with the clicker’s MAC address, you will only get the data and CRC, i.e. you will only be able to listen to a single clicker at a time. Associating the reading pipe with the base station’s MAC (0x123456) will ensure that you get responses from all clickers within range, and that you get the associated clicker MAC addresses too.
Code
I wrote an Arduino sketch to interact with the Arduino over serial, set everything up, and then listen for clicker input. The Arduino sends input from the clicker to the computer (or other device) over serial. The format is very verbose – I just threw it together as something human-readable for debugging and didn’t go back to make it quieter. It would be easy to modify the sketch to just send out binary data.
I also wrote a barebones Python script to turn clicker input into MIDI output. Hooking this up to a KORG Volca FM, you get what you see in the video at the top of the post! Now you know what to do with the clicker you thought you’d never use again.
You can access the code at my GitHub repository. Feel free to do whatever you want with it – I likely won’t be investing time into improving it much since I’m mainly focused on school and work at the moment. Pull requests are welcome! Some ideas I had for improvement are:
- Port the whole thing to Arduino (i.e. hook the Arduino up to a MIDI shield, get rid of the laptop as middleman)
- Add actually-interesting MIDI control capabilities (changing octaves, velocity)
- Make the serial comms format nicer
- Add bidirectional communication
- Allow channel changing etc. on the nRF24L01 without reflashing the Arduino
Note that you’ll have to install the RF24 and FastCRC Arduino libraries to get the sketch to compile, as well as the pySerial and rtmidi libraries for running the Python script (you can do the latter with a pip install -r requirements.txt).